Latest videos:
Thursday, December 29, 2011
Tuesday, November 15, 2011
Home Again
Nov 15th, 4p
Cierra's blood tests all came back negative meaning no infection. Her temperature maintained and she actually gained a couple ounces. So Sital and Cierra were set free from the PICU. Everyone is home now and doing well. Sital still has high blood pressure and some edema, so she's going in to see the doctor tomorrow morning. These are signs of pre-eclampsia which can lead to eclampsia, a condition that can cause serious seizures. Please keep Sital in your thoughts as she embarks on this tumultuous journey into motherhood.
This time we're home to stay.
Sunday, November 13, 2011
Trip to the ER
Nov 13th, 12p
Cierra went to the pediatrician this morning and he found that her temperature had dropped to 96.5. Low temperature can indicate an infection in infants, so he advised us to take her to the ER where she was put under a heat lamp and connected to machines that measure her heart rate, blood pressure, blood oxygenation, respiratory rate, and of course temperature. Several tests were run on her including chest x-ray, blood screen, and an attempted lumbar puncture. The doc was un-succesful in getting any spinal fluid from the lumbar puncture, so he gave up. They're pumping her full of antibiotics so the risk is low, but they'll likely try another LP later on. She'll be here until Tuesday waiting for cultures to come back. All test have come back negative so far. She's feeding well and looks perfectly healthy, so all of this seems extra-curricular.
Cierra went to the pediatrician this morning and he found that her temperature had dropped to 96.5. Low temperature can indicate an infection in infants, so he advised us to take her to the ER where she was put under a heat lamp and connected to machines that measure her heart rate, blood pressure, blood oxygenation, respiratory rate, and of course temperature. Several tests were run on her including chest x-ray, blood screen, and an attempted lumbar puncture. The doc was un-succesful in getting any spinal fluid from the lumbar puncture, so he gave up. They're pumping her full of antibiotics so the risk is low, but they'll likely try another LP later on. She'll be here until Tuesday waiting for cultures to come back. All test have come back negative so far. She's feeding well and looks perfectly healthy, so all of this seems extra-curricular.
Thursday, November 10, 2011
Bad Ass Baby
Admitted: Wed. Nov 9th, 2011 at 11:30a.
We are at Rex Hospital in room 236. The doc put a catheter in to dilate the cervix. Basically its a plastic tube with a balloon at the end. It's inserted past the cervix, into the uterus and then inflated. Some pressure is applied against the catheter and then it's taped to her leg. When the balloon pulls through the cervix, it's dilated to 3-4cm. At 10cm, the baby is ready to come out.
__________________________________________________________________
Wed. Nov 9th, 4:29p
The balloon has pulled through the cervix. They're now delivering Pitocin (oxytocin) to induce contractions and see if they can't start the motor.
__________________________________________________________________
Nov 9th, 6:12p
Dr. Inge came in and broke Sital's water with a crochet hook thing. It's on it's way. Should come sometime after midnight.
__________________________________________________________________
Wed. Nov 9th, 7:55p
Fighting the contractions.
Nothing rocks like natural childbirth!
____________________________________________________
Wed. Nov 9th, 9:42p
The contractions were evil. Send in the drugs please.
________________________________________________________________
Thur. Nov 10, 12:48a
The dilating continues. Sital is at 9cm now. Almost time to start pushing.
______________________________________________________________
Thur. Nov 10th, 2:00a
Sital is now 10cm and the pushing begins. Doc estimates 1-3hrs for delivery once the pushing starts.
No pics. Mom is angry.
______________________________________________________________
Thur. Nov 10th, 4:27a
2.5 hours of pushing and we have a girl! The umbilical cord was wrapped around her neck. Dr. Inge seemed a little stressed as he yanked on it and tried to force it over the top of her head. Would have been easier if the head wasn't so long. The head was about twice as long as it was tall. Not sure how long the cord was wrapped around the neck, but Inge got it over.
Mom and baby are both healthy.
 Gratuitous Closeup

Already suckin the thumb.

Rockin out to some Metallica. It puts her to sleep.
___________________________________________________________________
Fri. Nov 11, 11:45a
Last night was brutal. Cierra wouldn't stop crying. No rest for Mom at all. Dad can sleep through anything!
Cierra looking like Christopher Columbus about to conquer the world
They put a lowjack on our little girl so she doesn't run off.
_________________________________________________________________
Sat. Nov 12th, 12:15p
Cierra has minor Jaundice because Mom's blood is O+ and hers is A+ leading to incompatibility. To treat it, they're putting this radioactive looking blanket around her for the rest of the day (they call it photo-therapy). They'll check her billirubin levels again at 3p and see if we can go home.
Neonatal jaundice or Neonatal hyperbilirubinemia is a yellowing of the skin and other tissues of a newborn infant. A bilirubin level of more than 85 umol/l (5 mg/dL) manifests clinical jaundice in neonates whereas in adults a level of 34 umol/l (2 mg/dL) would look icteric.
Cierra's billirubin level was 10.3 last night.
__________________________________________________________________
Sat Nov 12th, 6:00p
Cierra's Billirubin dropped to 10.1 which apparently is good enough to go home. As long as you keep her wrapped up in this futuristic blanket. So we left. Thank God. That place was getting old.
Cierra is now quietly resting inside her radioactive blanket in her new home. Mom, Grandma Mody and Aunt Amy are busy nesting.
 ___________________________________________________________________
We are at Rex Hospital in room 236. The doc put a catheter in to dilate the cervix. Basically its a plastic tube with a balloon at the end. It's inserted past the cervix, into the uterus and then inflated. Some pressure is applied against the catheter and then it's taped to her leg. When the balloon pulls through the cervix, it's dilated to 3-4cm. At 10cm, the baby is ready to come out.
__________________________________________________________________
Wed. Nov 9th, 4:29p
The balloon has pulled through the cervix. They're now delivering Pitocin (oxytocin) to induce contractions and see if they can't start the motor.
__________________________________________________________________
Nov 9th, 6:12p
Dr. Inge came in and broke Sital's water with a crochet hook thing. It's on it's way. Should come sometime after midnight.
__________________________________________________________________
Wed. Nov 9th, 7:55p
Fighting the contractions.
Nothing rocks like natural childbirth!
 |
| F U |
Wed. Nov 9th, 9:42p
The contractions were evil. Send in the drugs please.
 |
| Ahh, drugs are good! |
________________________________________________________________
Thur. Nov 10, 12:48a
The dilating continues. Sital is at 9cm now. Almost time to start pushing.
 |
| That's a big foot. |
______________________________________________________________
Thur. Nov 10th, 2:00a
Sital is now 10cm and the pushing begins. Doc estimates 1-3hrs for delivery once the pushing starts.
No pics. Mom is angry.
______________________________________________________________
Thur. Nov 10th, 4:27a
2.5 hours of pushing and we have a girl! The umbilical cord was wrapped around her neck. Dr. Inge seemed a little stressed as he yanked on it and tried to force it over the top of her head. Would have been easier if the head wasn't so long. The head was about twice as long as it was tall. Not sure how long the cord was wrapped around the neck, but Inge got it over.
 |
| Mishapen head. Covered in cheese. Little on the light side. |
 | |
| For those that use the English system. |
 | |
| After a cleaning and a skull cap. |


Already suckin the thumb.

Rockin out to some Metallica. It puts her to sleep.
 |
| And Justice for All! |
Fri. Nov 11, 11:45a
Last night was brutal. Cierra wouldn't stop crying. No rest for Mom at all. Dad can sleep through anything!
Cierra looking like Christopher Columbus about to conquer the world
 | ||
| The incredible shrinking head. It's almost round. |
 |
| I think you can remove this by undoing the velcro. Plus her ankles are like rubber. |
Sat. Nov 12th, 12:15p
Cierra has minor Jaundice because Mom's blood is O+ and hers is A+ leading to incompatibility. To treat it, they're putting this radioactive looking blanket around her for the rest of the day (they call it photo-therapy). They'll check her billirubin levels again at 3p and see if we can go home.
Neonatal jaundice or Neonatal hyperbilirubinemia is a yellowing of the skin and other tissues of a newborn infant. A bilirubin level of more than 85 umol/l (5 mg/dL) manifests clinical jaundice in neonates whereas in adults a level of 34 umol/l (2 mg/dL) would look icteric.
Cierra's billirubin level was 10.3 last night.
 |
| She's radioactive. |
Sat Nov 12th, 6:00p
Cierra's Billirubin dropped to 10.1 which apparently is good enough to go home. As long as you keep her wrapped up in this futuristic blanket. So we left. Thank God. That place was getting old.
Cierra is now quietly resting inside her radioactive blanket in her new home. Mom, Grandma Mody and Aunt Amy are busy nesting.
 | |
| It's like sleeping on the Sun. |

Sunday, September 18, 2011
Handlebars
I decided I didn't like the dropped down handlebars and decided to get some straight bars. I looked all over the internet and couldn't find anything that was affordable. Everyone wants like $80 for a straight 7/8" SS rod.
So I just bought a piece of 304SS from McMaster and cut it to length.


So I just bought a piece of 304SS from McMaster and cut it to length.
Drop-back clubman bars

Straight bars

Not sure yet how I feel about the straight bars. Could go back. Will have to evaluate the ride with the different bars, although I favor form above function here.
Monday, September 5, 2011
Rust in the Tank
So I set out to find out what was going on inside the gas tank in case there was something dangerous in there. Did some research on the internet and there were lots of opinions. Flush it with Kleen, Por-15, Pressure Wash it, Pour in some Acid, Put rocks inside and shake it around. Hmm. The rock idea sounded cool. So did the acid. So that's what I did.
Went to Lowe's (Home Depot is cooler) and picked up some Muriatic acid (Hydrochloric). Needed about a gallon as the internet recommends mixing a 1:1 water/acid solution before flushing.
Started by flushing it a bunch of times with good ol H2O.
Flipped it over and flushed again...
This kind of rusty soot came out first...
Then added rocks.
I originally thought that inventory management would be important here as I didn't want to leave any rocks behind so i took copious notes on the qty and shape of every rock I added (10 in total of similar shape and size).
In the end however, I proved to be overthinking the problem as any rocks left behind make a distinctive clanging noise on the inside of the tank when its shaken. Wasted brain.
So once the rocks were added, I shook the f*** out of it. This s*** came out:
This happened several times and then stopped.
Next I mixed up a 1:1 batch of H20/Muriatic Acid. I poured it into the tank via this handy tubing rig I came up with all by myself (not really, I got it off the internet). Apparently this stuff eats through paint pretty quickly so I took precautions as this paint job is what sells the bike.
I waited about an hour and then emptied it out. It definitely took on a different hue on the way out.
Then I flushed it a bunch more times with water. The Muriatic Acid did an awesome job of cleaning out the rust. You can look down inside the gas tank from the top and once the acid bath was complete, all I could see was shiny metal. I am impressed!
Check that one off the list. I was dreading this job, but it turned out alright. Now I'm gonna go watch Walter White work his magic with chemicals in Albequerque.
Went to Lowe's (Home Depot is cooler) and picked up some Muriatic acid (Hydrochloric). Needed about a gallon as the internet recommends mixing a 1:1 water/acid solution before flushing.
Started by flushing it a bunch of times with good ol H2O.
 |
| Flushing the top hole |
 |
| Flushin the bottom hole |
 |
| Sooty seat |
 |
| Rust busters |
I originally thought that inventory management would be important here as I didn't want to leave any rocks behind so i took copious notes on the qty and shape of every rock I added (10 in total of similar shape and size).
 |
| Rock Inventory. Fascinating! |
So once the rocks were added, I shook the f*** out of it. This s*** came out:
 |
| Clump of nastiness ready to destroy my engine! |
Next I mixed up a 1:1 batch of H20/Muriatic Acid. I poured it into the tank via this handy tubing rig I came up with all by myself (not really, I got it off the internet). Apparently this stuff eats through paint pretty quickly so I took precautions as this paint job is what sells the bike.
 |
| Muriatic Acid rules. I feel like making Meth. |
 |
| I hope that plant survives. |
Check that one off the list. I was dreading this job, but it turned out alright. Now I'm gonna go watch Walter White work his magic with chemicals in Albequerque.
Welded Steering Column
I took a TIG welding class at TechShop by a high-energy old coot named Scott Saxon. He was pretty good as far as a teacher goes. I felt pretty knowldegable afterwards. Below is my first TIG weld bead.
So with that in mind, I'd targeted the seat post for some welding, but that job turned out to be easier solved by just driving a threaded shaft through the frame and jamming on some nuts. So that left the steering column/handlebar post to be welded.
I machined up this plate that mounted to the handlebar clamps that came off the green Puch. Turns out they made a lot of changes from 77 to 78 in terms of the Puch's design. The handlebars were the first I noticed. On the red 77, they mount with a post that's wedged down in the front forks. On the green 78, they mount directly to a the triangular piece of sheet metal that joins the front forks with the frame. Since I'm rebuilding the 77, I decided I wanted to do the post mount option as it gives me some height adjustability. However, the old handlebars on the 77 are welded together as one piece and there's no way to get my new handlebars mounted to the old hardware. So I chopped off the vertical column and made a plate to combine the abilities of the 77 and 78.
This is all good, except that the plate isn't fixed in rotation relative to the tube. You can crank down on the center shaft, but there's just not enough friction in the world that you can create to withstand the giant moment arm of the handlebars and wheels. Let's weld the f*(#$% together!
I did have to make an aluminum spacer to put inside the tube to make sure it was centered with hole in the plate where the locking bolt goes. I used a dowel pin to align the two and then clamped everything together.
The first tack went somewhat ok. It held things together good, but the aesthetics leave something to be desired. I also think I was jamming on the power a little hard and overdid things. I could definitely use some foot control.
Tried tacking the other side and got my filler rod jammed in my pool.
Had to sharpen the Tungsten electrode several times cause I kept getting too close with it as well.
Then finished going around the perimeter. Check out that beautiful bead!
Again, this is not going to be visible.
So it turned out to be functional and a good little job to practice the TIG skills.
Gimme somethin else to weld dammitt!
 | |
| Not a bad bead for a newbie |
I machined up this plate that mounted to the handlebar clamps that came off the green Puch. Turns out they made a lot of changes from 77 to 78 in terms of the Puch's design. The handlebars were the first I noticed. On the red 77, they mount with a post that's wedged down in the front forks. On the green 78, they mount directly to a the triangular piece of sheet metal that joins the front forks with the frame. Since I'm rebuilding the 77, I decided I wanted to do the post mount option as it gives me some height adjustability. However, the old handlebars on the 77 are welded together as one piece and there's no way to get my new handlebars mounted to the old hardware. So I chopped off the vertical column and made a plate to combine the abilities of the 77 and 78.
 |
| Plate to post mount and bracket mount at the same time. |
 |
| What the setup looks like assembled. |
 |
| Post and Plate fixtured and ready to spot. |
 |
| Ready |
 |
| An ugly job indeed. |
Tried tacking the other side and got my filler rod jammed in my pool.
 | |
| Stuck filler rod. Had to pry it loose with a pliers. Coulda just heated it up again. Duh. |
 |
| Sharpened Tungsten |
 |
| That's nasty. |
 |
| Wow. A thing of beauty. |
 |
| Can't even see that weld. |
 |
| Unless you look from this angle. |
 |
| Finished product. |
Saturday, September 3, 2011
Seat and Tail
Today I got back on the project and decided to mount the seat and chop the tail.
The seat is set up to mount to a post, but I want it to sit low. It has this giant spring in it for a cushioned ride, but it kills the look if you have it sit up off the frame. So I busted the hardware out of the seat and mounted it directly to the frame with a 3/8-16 threaded rod and a couple nuts.
Luckily there's a bracket welded to the front of the seat that has a cross hole all the way through to mount the spring and hardware. It lined up pretty well with the hole in the frame that's used to compress down on the seat tube by tightening a bolt.
Turned out pretty decent. The seat is a little bigger than I want, but its growing on me.
I also decided to chop that gay tail off the back end today. I used that fancy laser level thing I bought for notching the wheel earlier. it gave me a straight line that I could line up with the front of the fender. Used a black sharpie to trace over the line.
Then I pulled out the angle grinder I bought from Harbour Freight a few weeks ago and went to town on it.
Turned out pretty good. I might give it a slight upward angle, but I kind of like the straight back lines for now.

 And with that, the work on the tail is complete. Next is mounting the handlebars, cleaning out the gas tank and mounting the engine.
The seat is set up to mount to a post, but I want it to sit low. It has this giant spring in it for a cushioned ride, but it kills the look if you have it sit up off the frame. So I busted the hardware out of the seat and mounted it directly to the frame with a 3/8-16 threaded rod and a couple nuts.
 | |
| Seat Hardware |
 |
| Stock Seat |
 |
| Puch seat mounted to frame |
I also decided to chop that gay tail off the back end today. I used that fancy laser level thing I bought for notching the wheel earlier. it gave me a straight line that I could line up with the front of the fender. Used a black sharpie to trace over the line.
 | ||
| Laser tracing with sharpie. |
 |
| Tail gone. |


Tuesday, August 16, 2011
CNC Plasma Cutter
I took a CNC plasma cutting class tonight at TechShop. It was really well run by this guy that does custom tools for working on old muscle cars named John.
He had us cut out a frame support bracket that welds onto some muscle car. We cut it out of 12ga mild steel (.110" thick).
The cutter is mounted to an x,y gantry that's computer controlled. You improt a .dxf file of whatever 2D shape you wanna make and then convert it to G code which controls two steppers. The up and down movement of the nozzle is controlled with a different program that lives on the machine and you don't control. The machine can easily hold a 4'x8' sheet.
There's a water bath below (actually touching) the sheet steel that absorbs any noxious fumes generated when the plasma arc obliterates the metal its cutting. Apparently there's a plasma arc that's created with high voltage and current (we used 60A at 144V!) that jumps from the nozzle to the metal you're cutting. You can't cut anything that doesn't conduct electricity btw. But it basically melts the metal immediately and then a swirling jet of air comes through the plasma arc and blows the metal out of the way. Essentially it acts very similar to an end mill except that instead of a spinning sharp tool edge, you have a super-hot spinning arc. They even refer to climb cutting and conventional cutting in the class to demonstrate that the quality of the cut with a plasma cutter depends on which side of the arc you cut based on your direction of travel. Basically, if you're going in a straight line, you get a better cut on the right side of the arc than the left.
There's some software that you use to import your geometry called partworks. It lets you convert to G-code which gets loaded on the machine.
Then you run the thing.
There are basically two electrodes/nozzles that are used (at least by John). You can use a 40A or 60A nozzle. 40A would be for thicknesses less than .100. You can cut stainless steel up to 1/2" thick with this thing!
There's a pretty decent bezel angle created when you cut and it varies greatly depending on feed rate but is generally around 3degrees. It seems like the slower you cut, the more bezel angle you get, but I can't remember why that sticks in my mind. If you cut too slow, the arc acts erratically because the metal gets blown away where you're cutting and the nozzle is essentially sitting over free space so it looks for the nearest metal to jump to. You get some pretty jagged cuts this way. This isn't precision cutting by any means, but we cut out some decent sized pieces of mild steel in a matter of minutes.
As you can see from the photo, the slag created by the plasma arc is significant. This ends up on the bottom side of the part. The top looks pretty clean. You can break off this slag with your finger, so it's not much of a problem, but takes some post-processing to finish.
Gonna try and make some moped chassis using this thing.
He had us cut out a frame support bracket that welds onto some muscle car. We cut it out of 12ga mild steel (.110" thick).
The cutter is mounted to an x,y gantry that's computer controlled. You improt a .dxf file of whatever 2D shape you wanna make and then convert it to G code which controls two steppers. The up and down movement of the nozzle is controlled with a different program that lives on the machine and you don't control. The machine can easily hold a 4'x8' sheet.
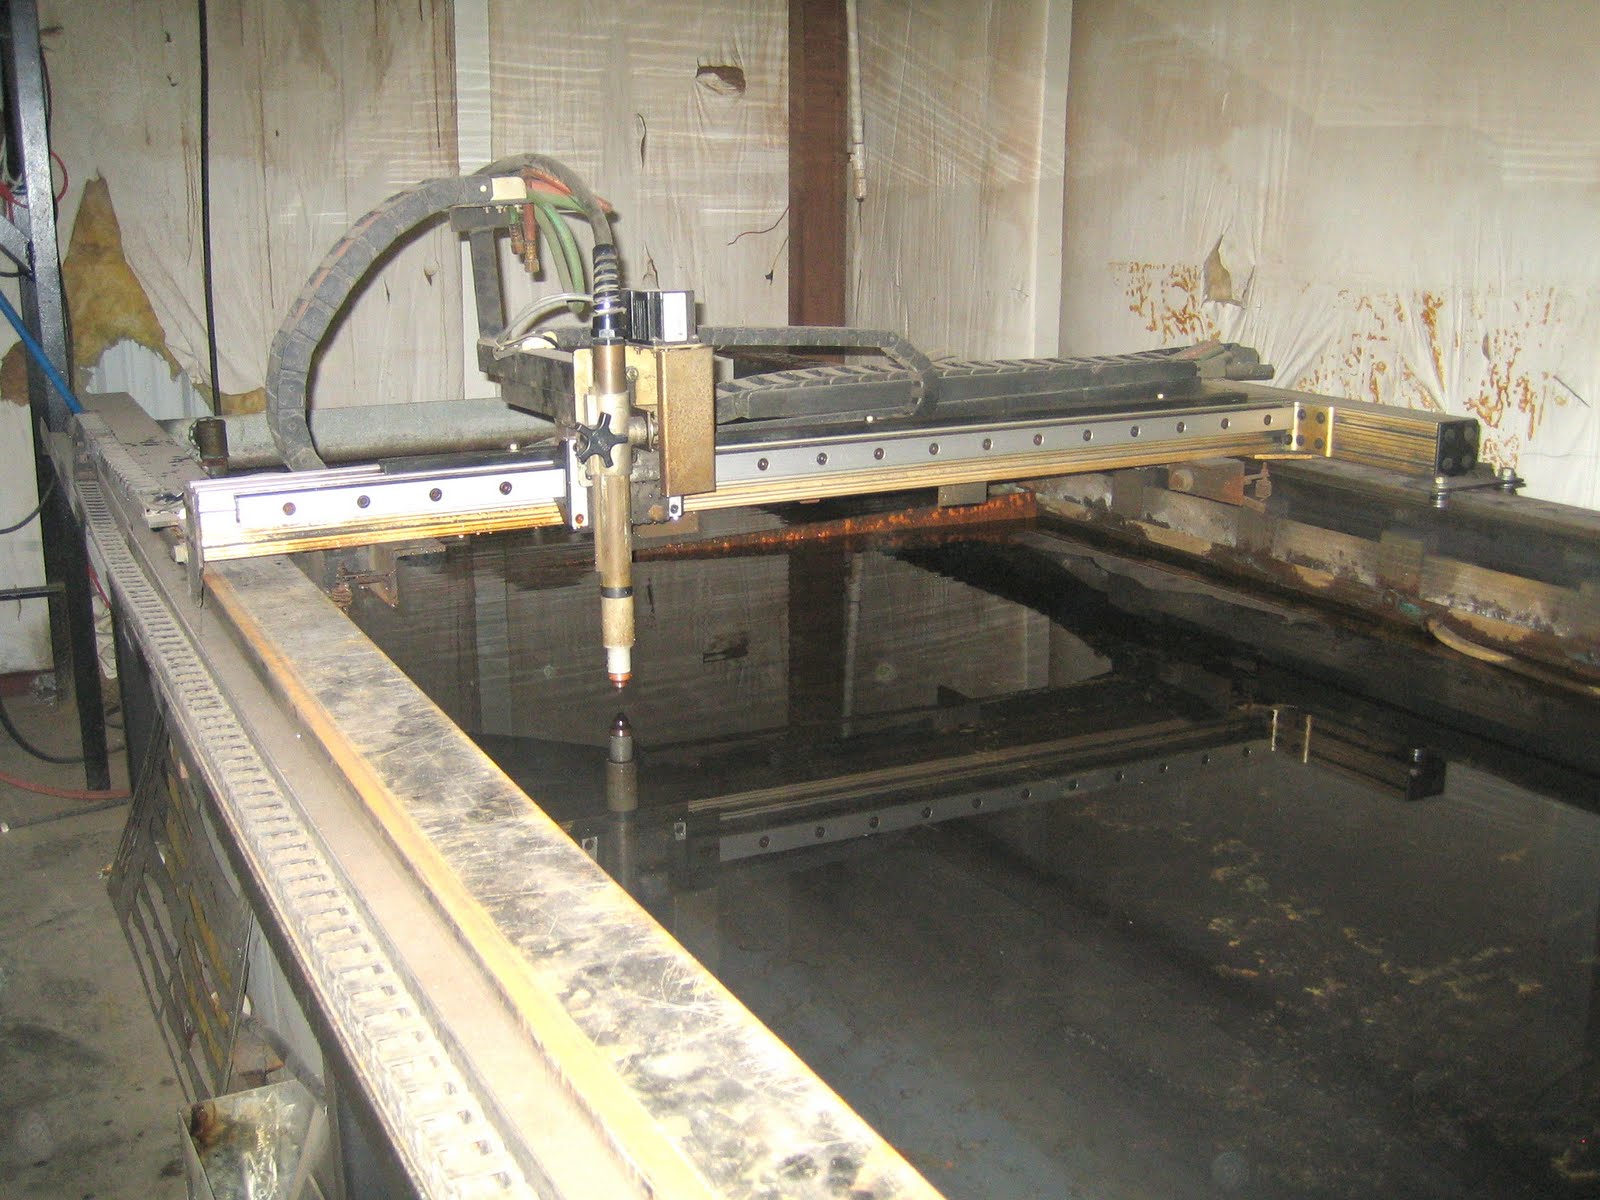 |
| CNC Plasma cutter setup at TechShop |
There's some software that you use to import your geometry called partworks. It lets you convert to G-code which gets loaded on the machine.
 |
| Software program |
Then you run the thing.
 |
| Wear glasses when looking at this picture |
 |
| Close-up of nozzle |
 |
| Nozzle pieces. The one with the fins is the electrode. |
There's a pretty decent bezel angle created when you cut and it varies greatly depending on feed rate but is generally around 3degrees. It seems like the slower you cut, the more bezel angle you get, but I can't remember why that sticks in my mind. If you cut too slow, the arc acts erratically because the metal gets blown away where you're cutting and the nozzle is essentially sitting over free space so it looks for the nearest metal to jump to. You get some pretty jagged cuts this way. This isn't precision cutting by any means, but we cut out some decent sized pieces of mild steel in a matter of minutes.
 |
| Slag on bottom of part |
Gonna try and make some moped chassis using this thing.
Subscribe to:
Comments (Atom)